Home > Help > Uploads
Uploads
Various options are available for uploading the assets.

There are various ways to upload assets.
We can upload assets
into the general asset pool
directly to specific collections
and folders.
Versions of an asset (from Photoshop) can also be uploaded.
Here you will find an overview of which assets belong where and how the upload options work.
Which assets go where?
Graphic assets like the following...
- Retouched motives
- Translations
- Illustrations
- Screenshots
- Content for customers such as teasers
shall be stored here:
Tab Graphic Design > Graphic Design collection for your market
Graphic assets - Print files
Print files are stored here:
Tab Print Media > Print collection for your market
Grafikassets - Newsletter content
Newsletteri content is stored here:
Tab Newsletter > Newsletter collection for your market
Shootingassets
Images/videos from shootings (with only basic retouching) go into the area
Shootings & Campaigns
Create new shooting collection: Collections – Create collection – Type Shooting collection
Webassets for CEWE websites
Content created for the CEWE websites (including workfiles such as PDS with the artboards for module cropping) go into:
Tab Webassets > collection for your market > appropriate sub-collection
Add to exisiting web asset collection (or create a new one if not existing yet, via Collections + create collection)
Webassets - Social Media content
Social Media content goes here:
Tab OM & Social > Socialmedia collection for your market
Webassets - Online Marketing content
Online Marketing content goes here:
Tab OM & Social > Online Marketing collection for your market
Stockassets
Stockbilder
Normal Upload – Select Upload folder Stockassets
Upload in collection
Step 1
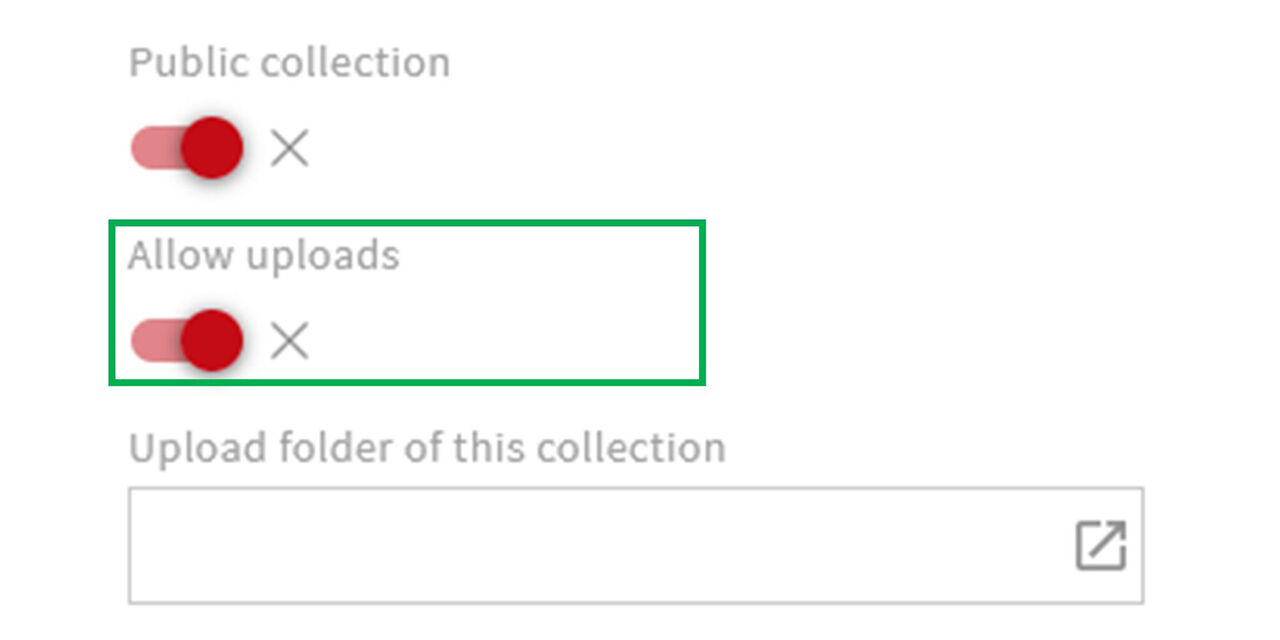
Assets can be uploaded directly to a collection. The precondition is:
Either you are participant of that collection with appropriate rights
or your user role corresponds to one of the possibly stored participating roles
and Upload of files is allowed
Select a collection. At the bottom left you would see the set up.
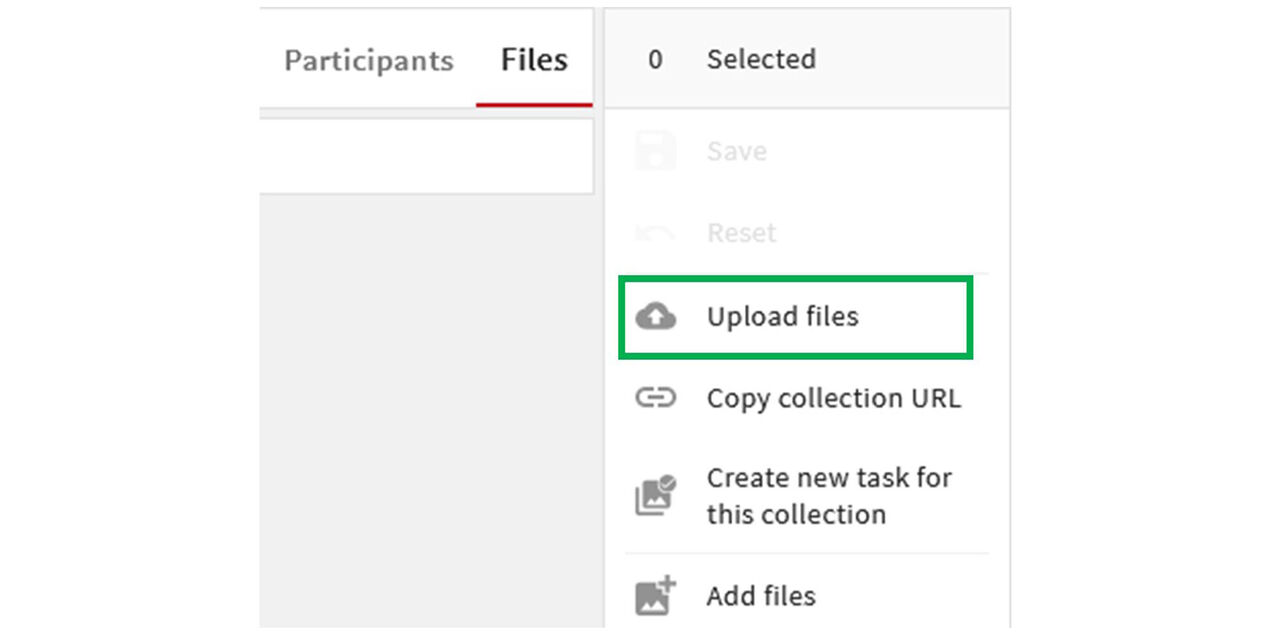
Step 2
Click on "Upload file"
One or more files can now be selected as usual and the necessary metadata can be added.
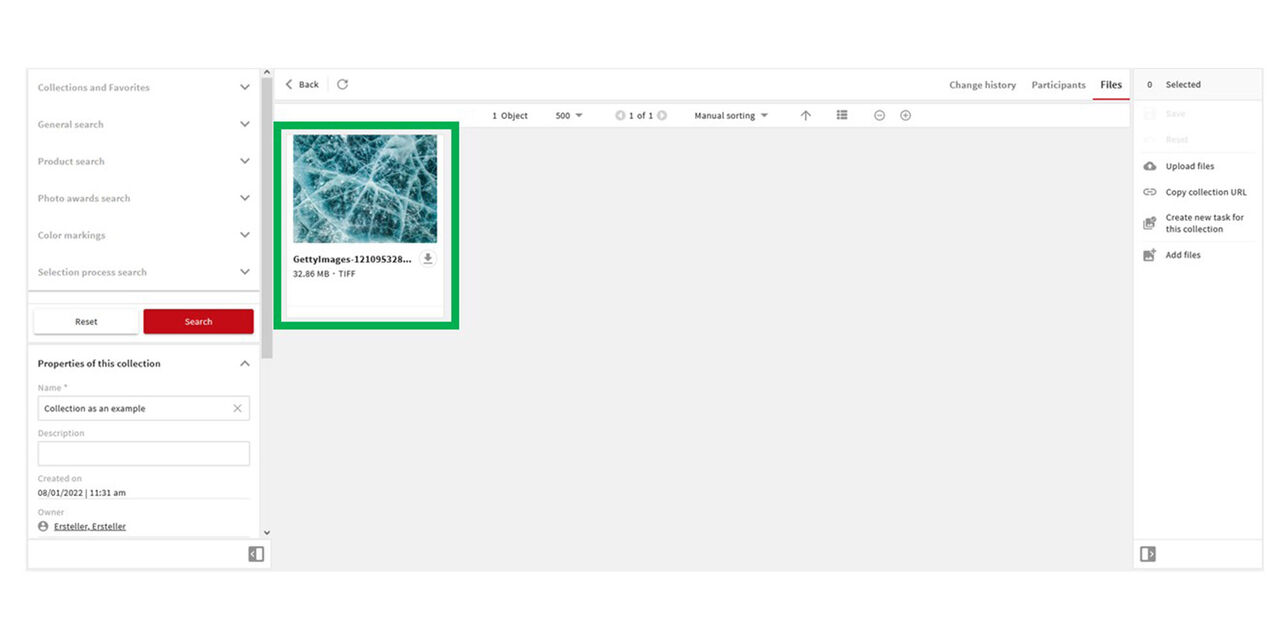
Step 3
After the upload is completed, the asset will be visible in the collection.
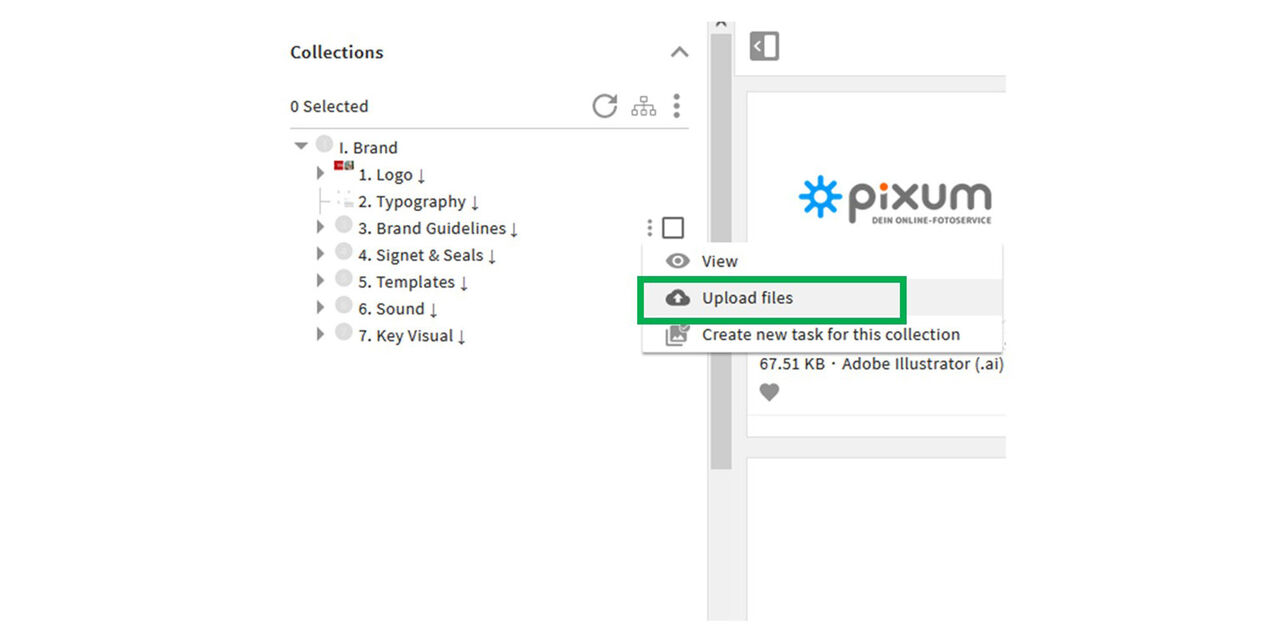
Alternative
If you go to the collection structure of an area, you can also upload directly via the three dots next to the corresponding collection.
Upload via cloud
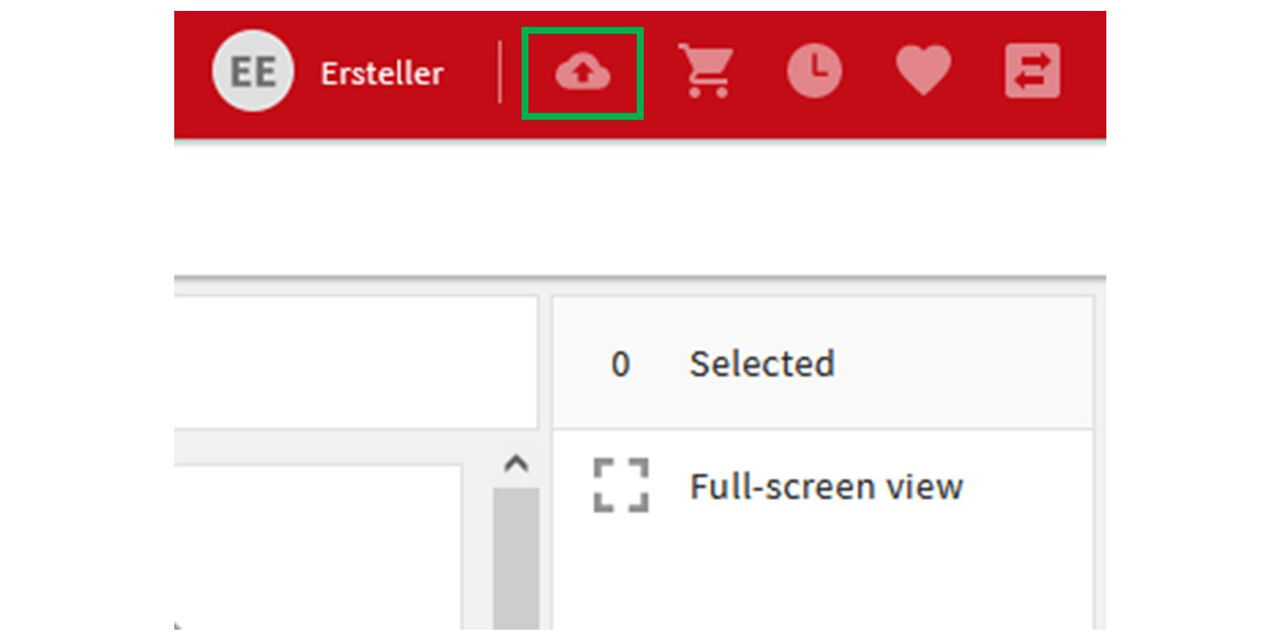
Step 1
Click on the cloud to upload one or more files to CEWE MediaAssets
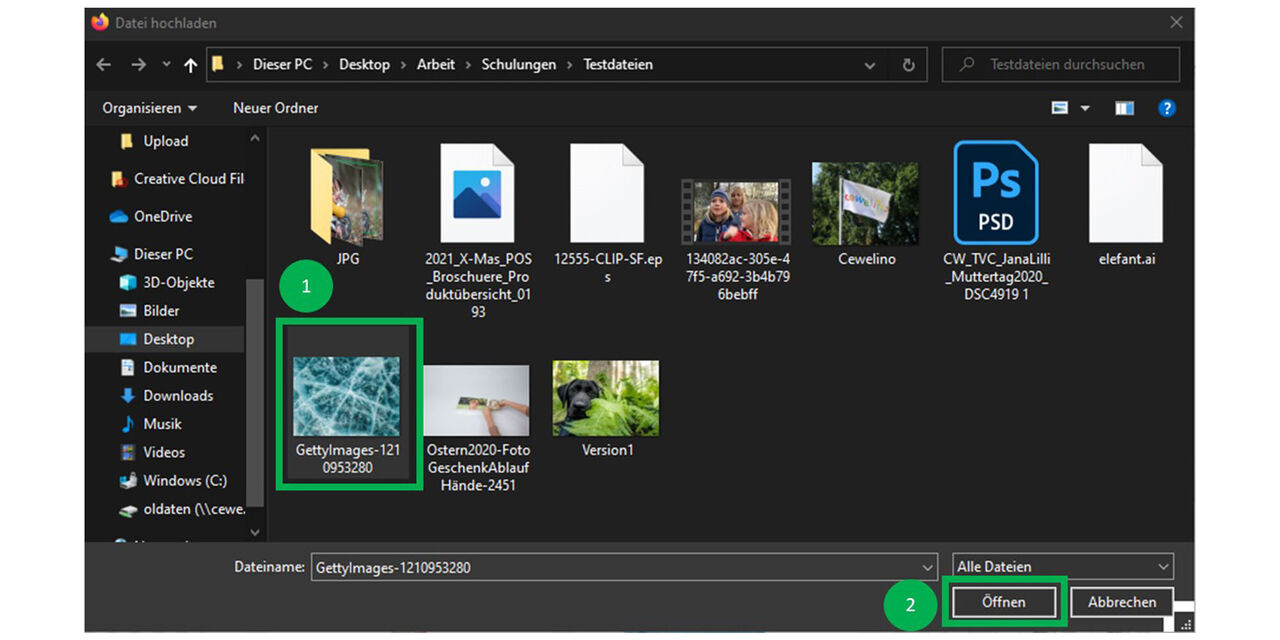
Step 2
Choose the picture you would like to upload to CEWE MediaAssets.
Click on “open”
Alternatively you can use Drag&Drop.
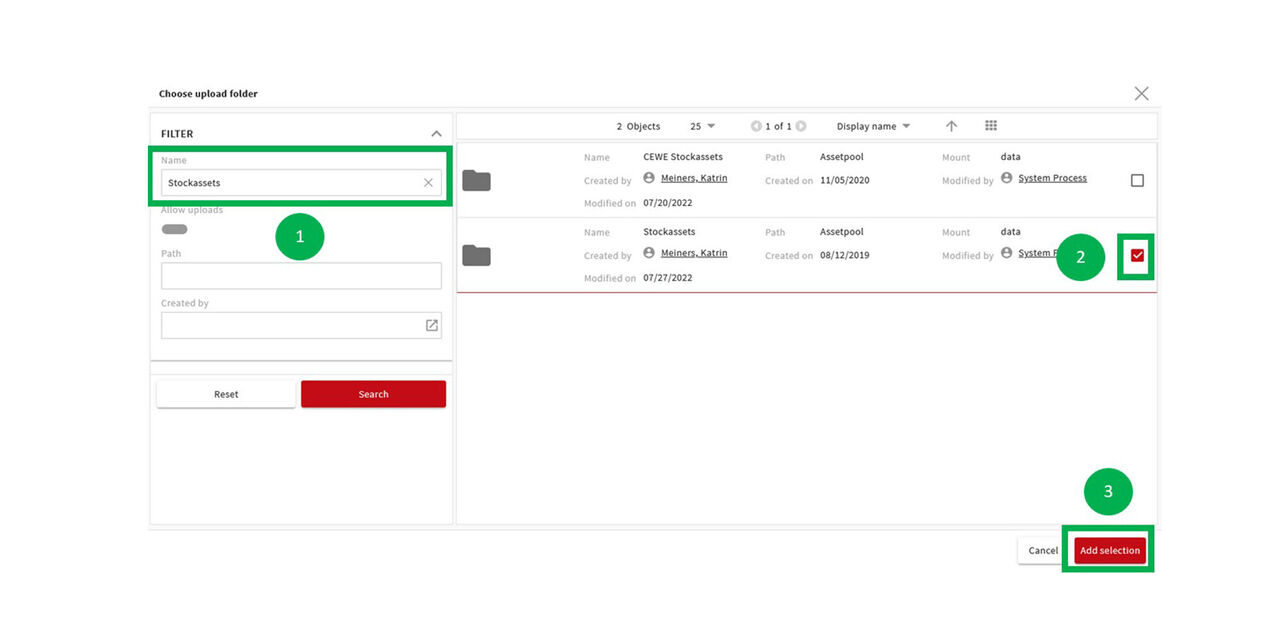
Step 3
Search for an upload folder using the filters The name of the upload folder usually corresponds with the asset type. (see links below)
Select the appropriate folder
Click on “Add selection”
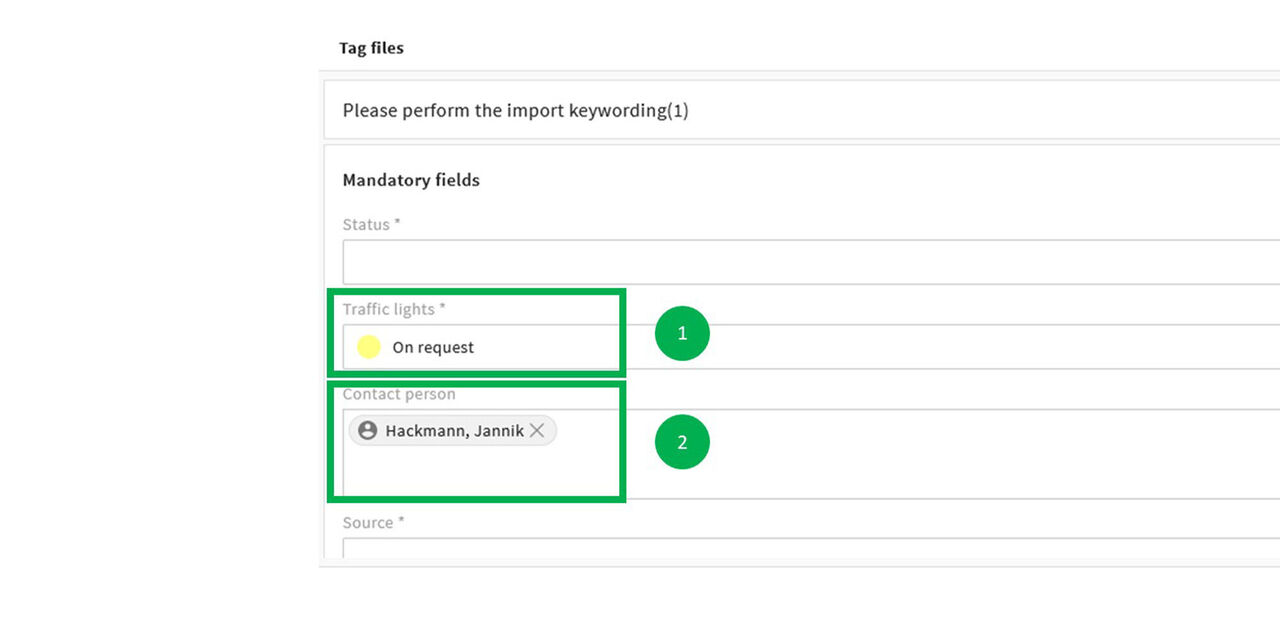
Step 4
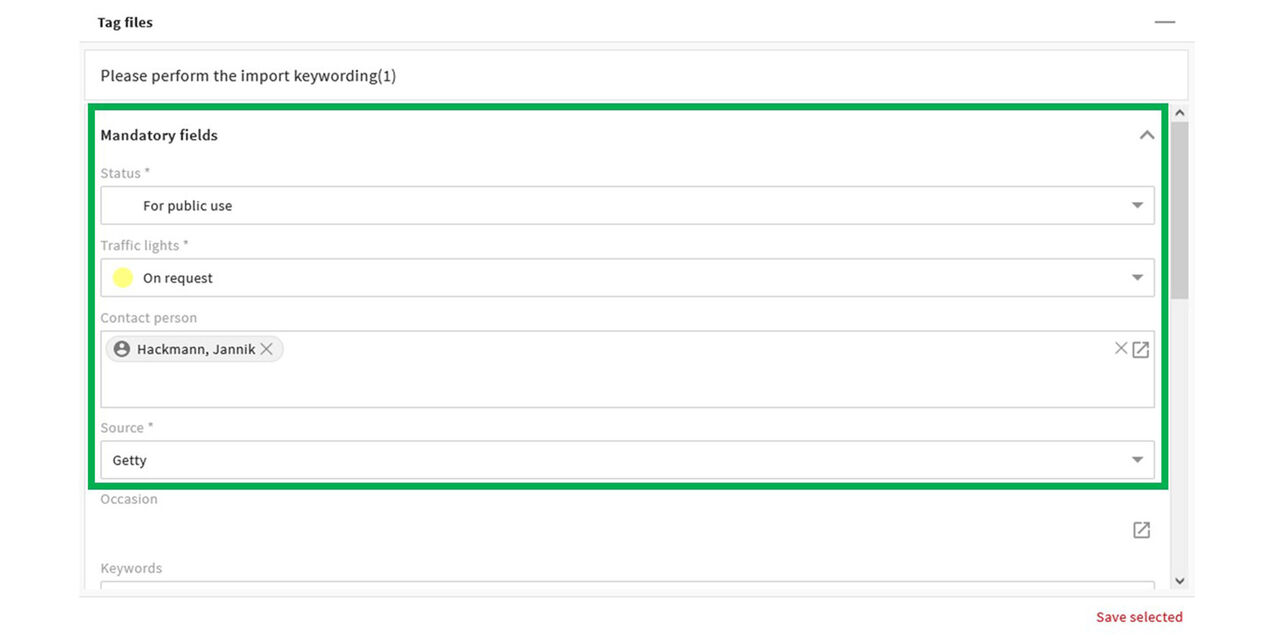
Depending on the selected upload folder and the given status, certain metadata fields have to be filled out. The mandatory fields are marked with an asterisk.
In this case, a stock asset is uploaded to the Stockassets upload folder. A mandatory tag field is the Source. The traffic light status was set to Upon request”. Therefore the contact person(s) must be entered.
Click on “Save Selected”.
Step 5
The asset has been uploaded successfully.
By the way:
- The file transfer in the navigation bar shows you the status of the upload.
- A green bar will appear at the bottom left of the screen once the upload is complete.
Upload in folder
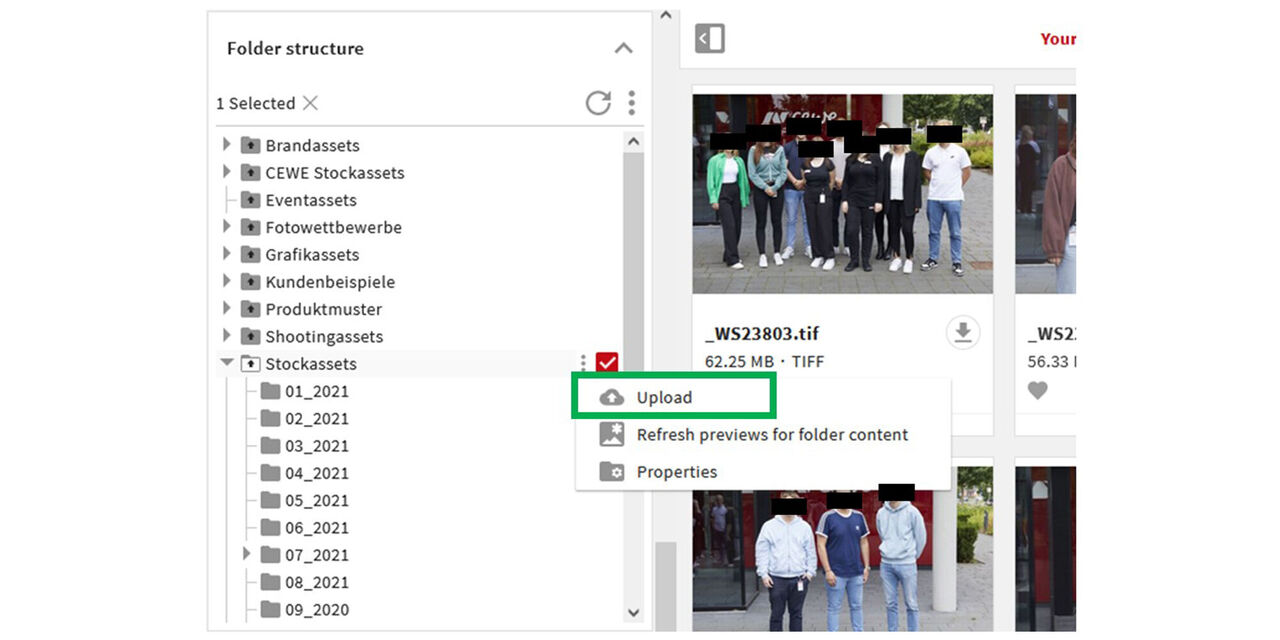
Upload in folder
For an upload directly to a folder - go to the files module - scroll down to the folder structure - click on the three dots next to the appropriate folder - and select “Upload”.
Now the metadata can then be added.
Some users (mainly suppliers + content marketing) have the option of uploading via other areas visible to them, where further relevant sub folders are available. Here the upload must be allowed by the folder settings.
Cancel upload
Cancel upload
There can always be reasons to cancel an upload, e.g. because the network speed is not optimal or because there is an error.
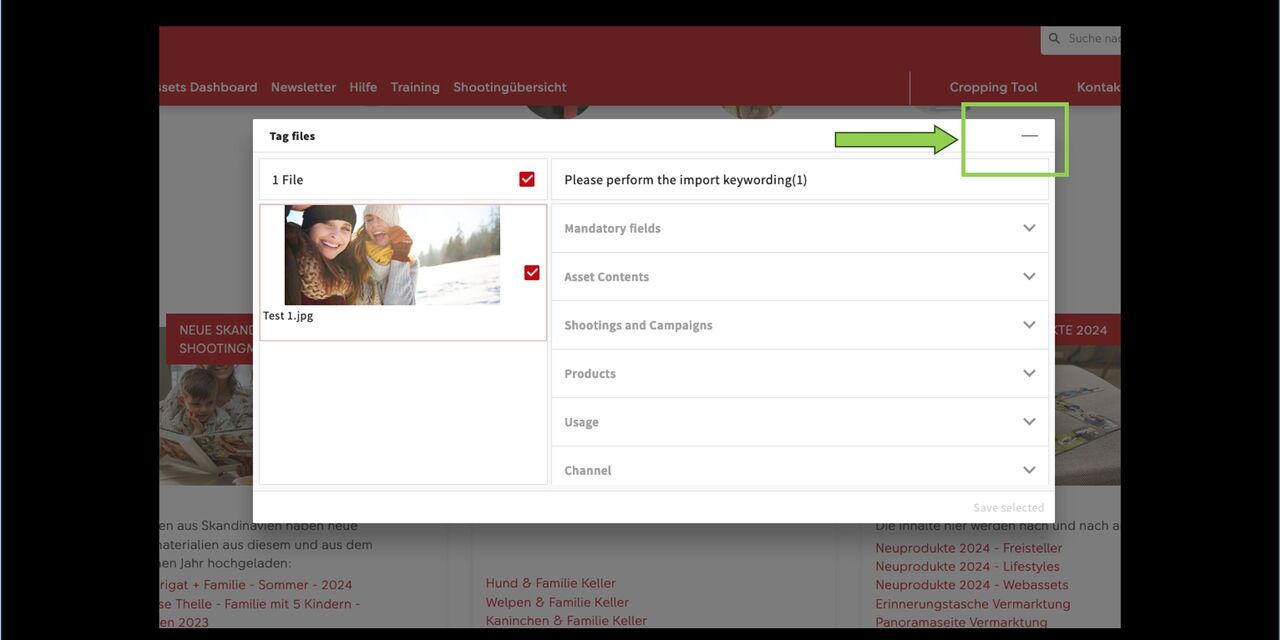
In such cases, simply click on the small line at the top right of the import window.
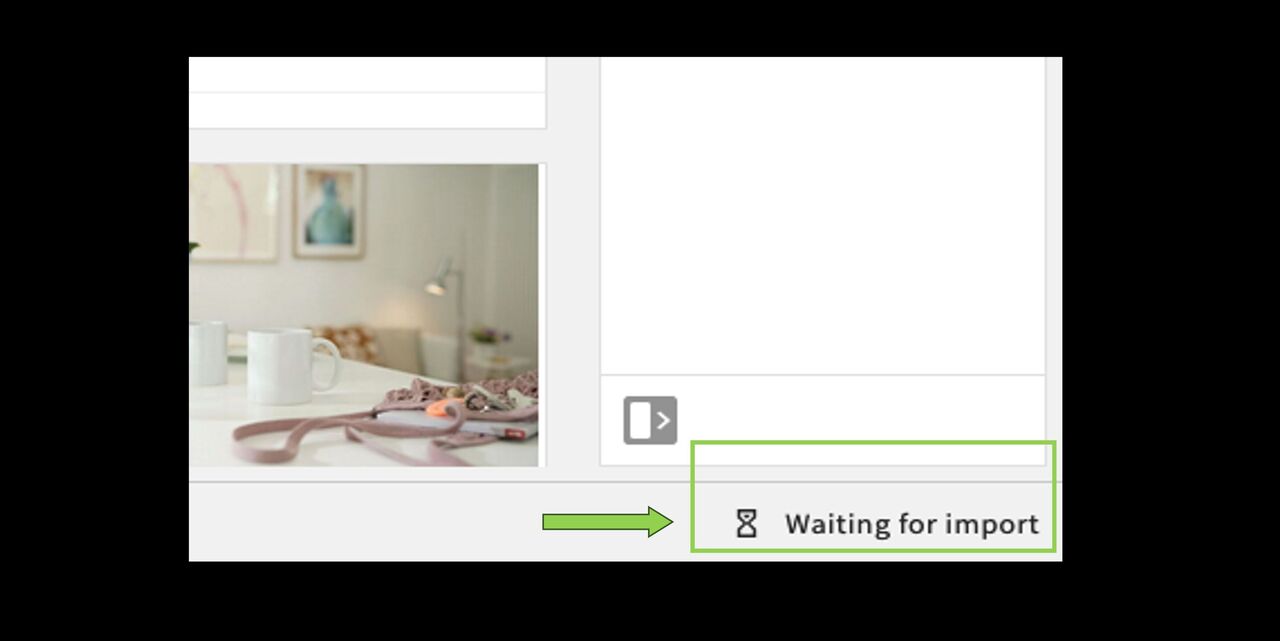
In the bottom right-hand corner of your screen you will see the message:
Waiting for import
Click on it.
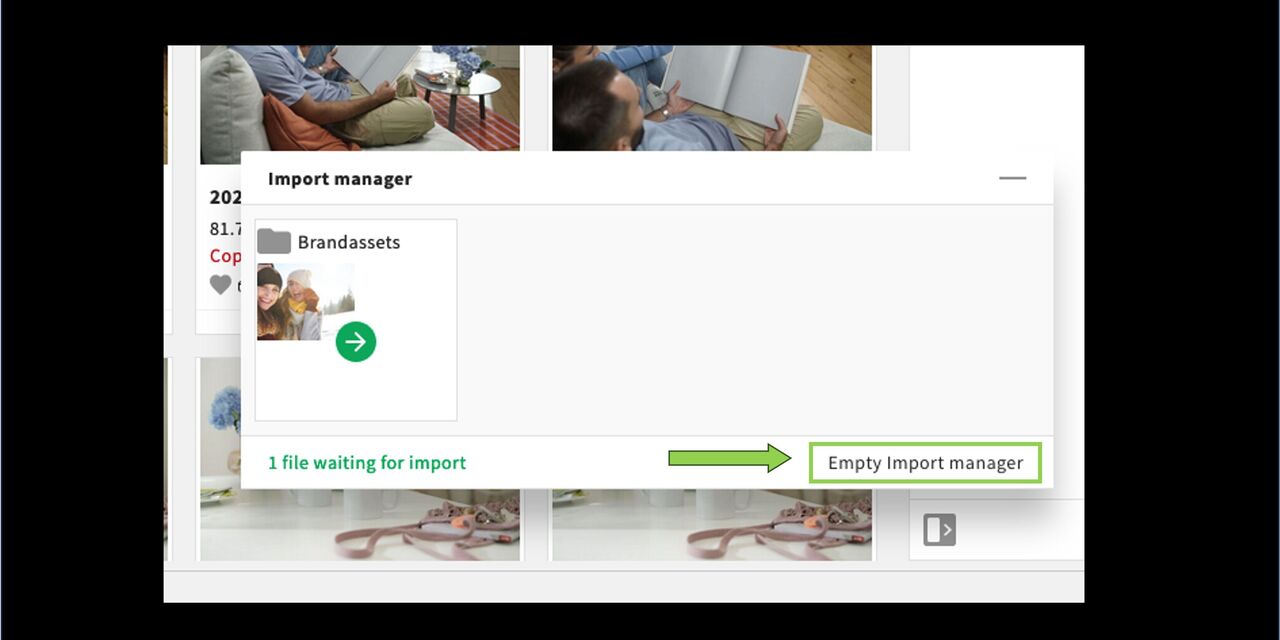
Then this option appears:
Clear import manager
(freely translated: cancel upload:-)
Click on it.
Done - the displayed image will not be uploaded!
Restrict an asset (download) via traffic light

Why
The usage of assets can be restricted due to specific circumstances, e.g if further editing is pending or the asset is not eligible for every user. You can add these restrictions already when uploading the asset.
The download for other users can be completely blocked or set on request.
Furthermore, the usage can be restricted, e.g for partners only, countries, etc. This would not restrict the download. More about this under "Usage restriction"
Set asset on request
You would like to set this asset on request.
Select the traffic light status yellow
Insert your name and possible further colleagues as contact persons who can
approve a requested download
Appearance
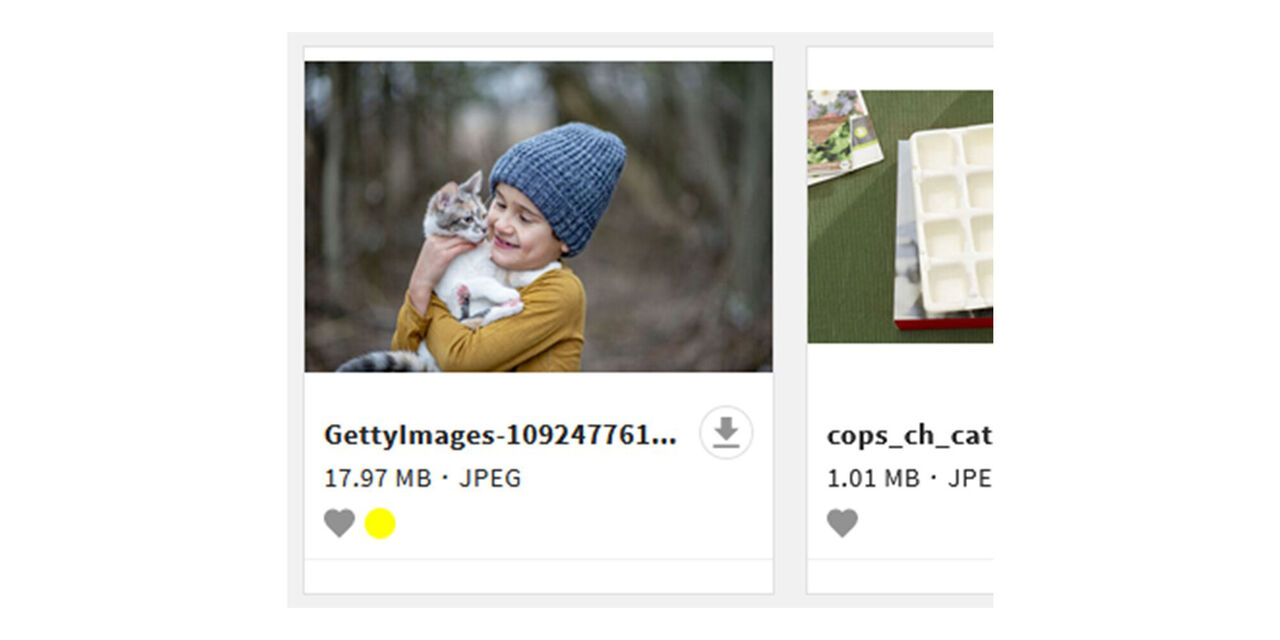
Once all other necessary metadata have been added and the asset has been uploaded, it will appear in the system with the yellow traffic light.
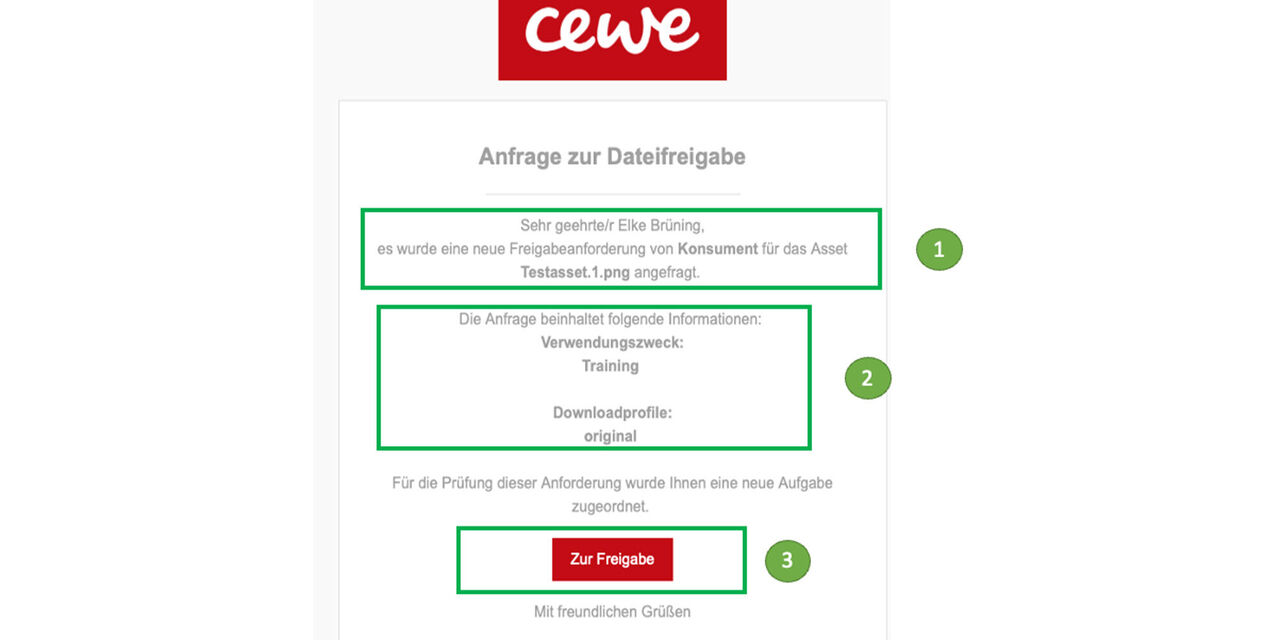
If another user wants to download this asset, the system generates an e-mail with the request that can be approved or denied by you or any of the named contact persons.
Who wants to download which asset?
What is the reason /usage and which format is needed?
Click on approve
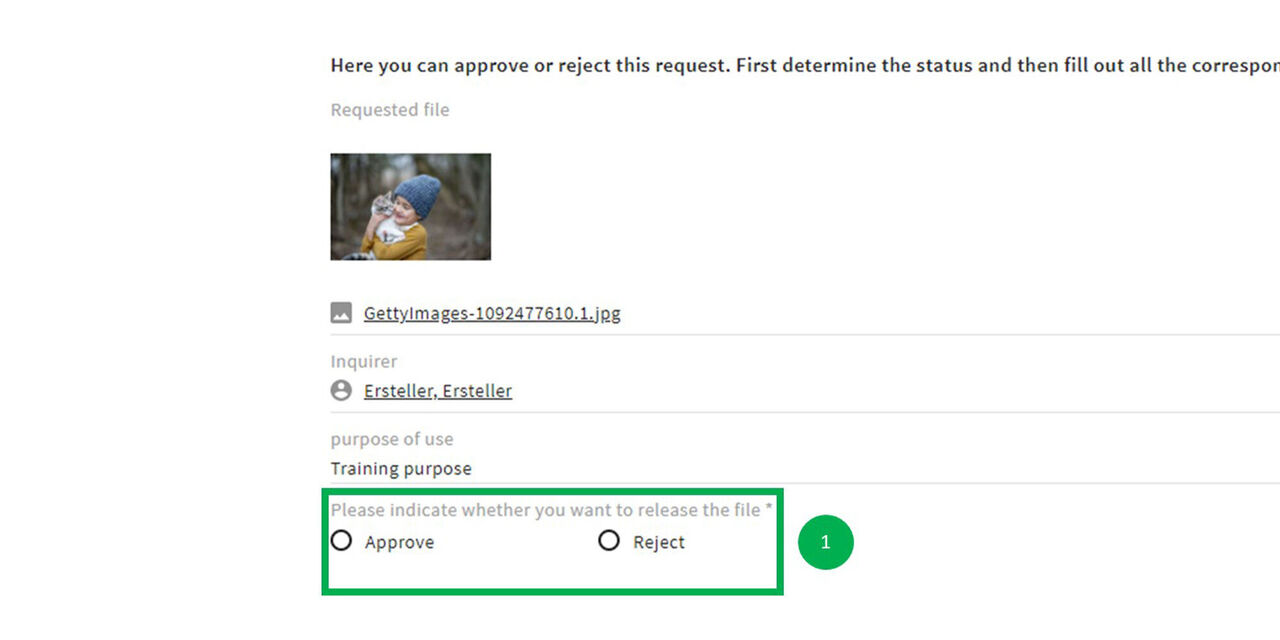
Approve
The system will now take you to the Tasks area (You can also access this area at any time via the mega menu in the top left).
- Here you can see the reason for the request and you can approve or reject it.
In case you need to reject the request please add the reason using the given textbox.
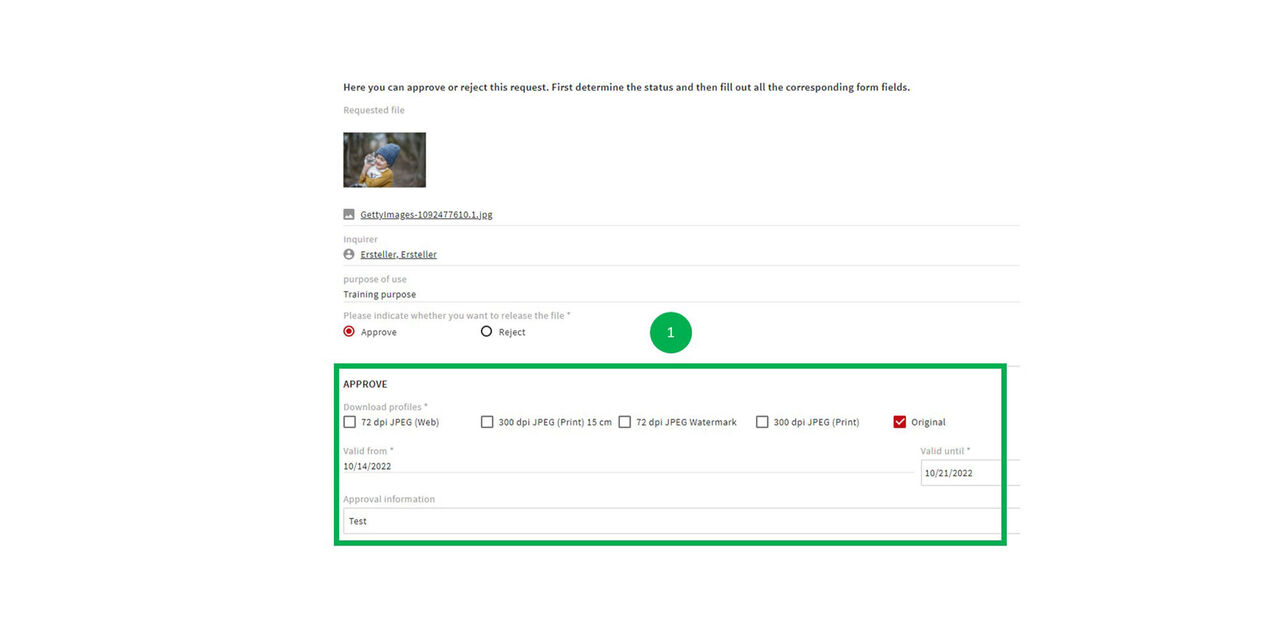
Approval
Now, please add the following:
Download profiles
Download timeslot (determines the validity of the link sent with this release)
Notes that you want to add
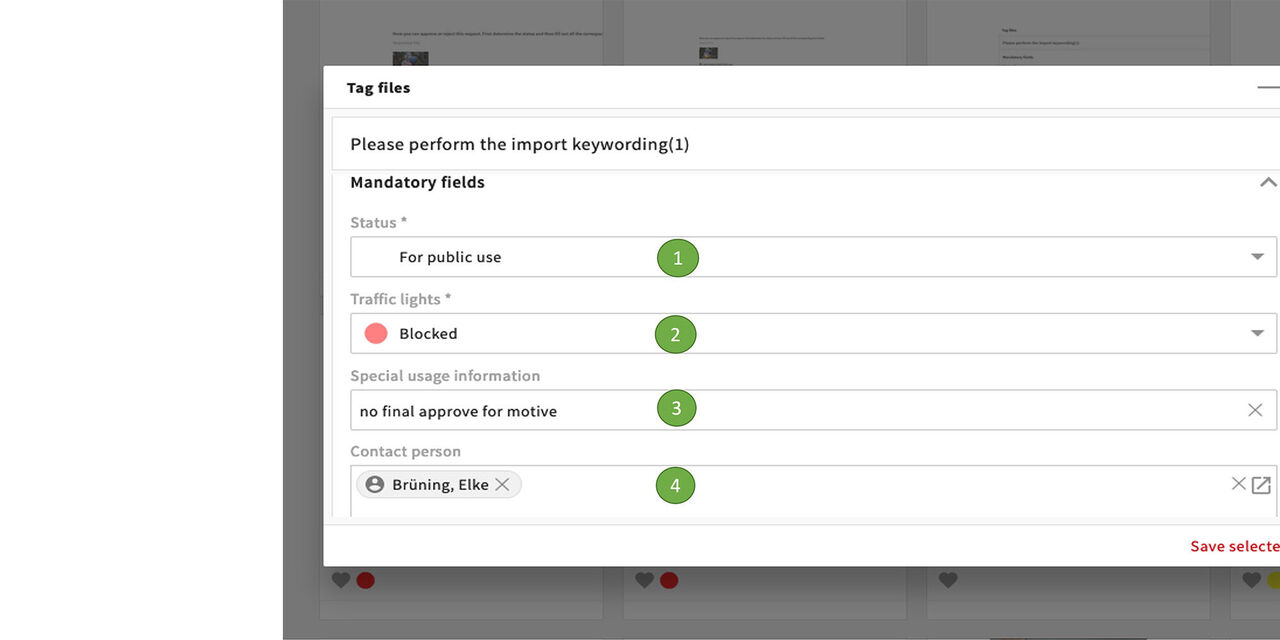
Block asset
You want to completely block the asset for the moment, please use the red traffic light.
- The asset could basically be without usage restriction
- It will be currently blocked because:
- the motive has not been finally edited so that it is not yet usable
- Also here please enter the contact person
A blocked asset can be released by the contact person or an administrator. There is no request process.
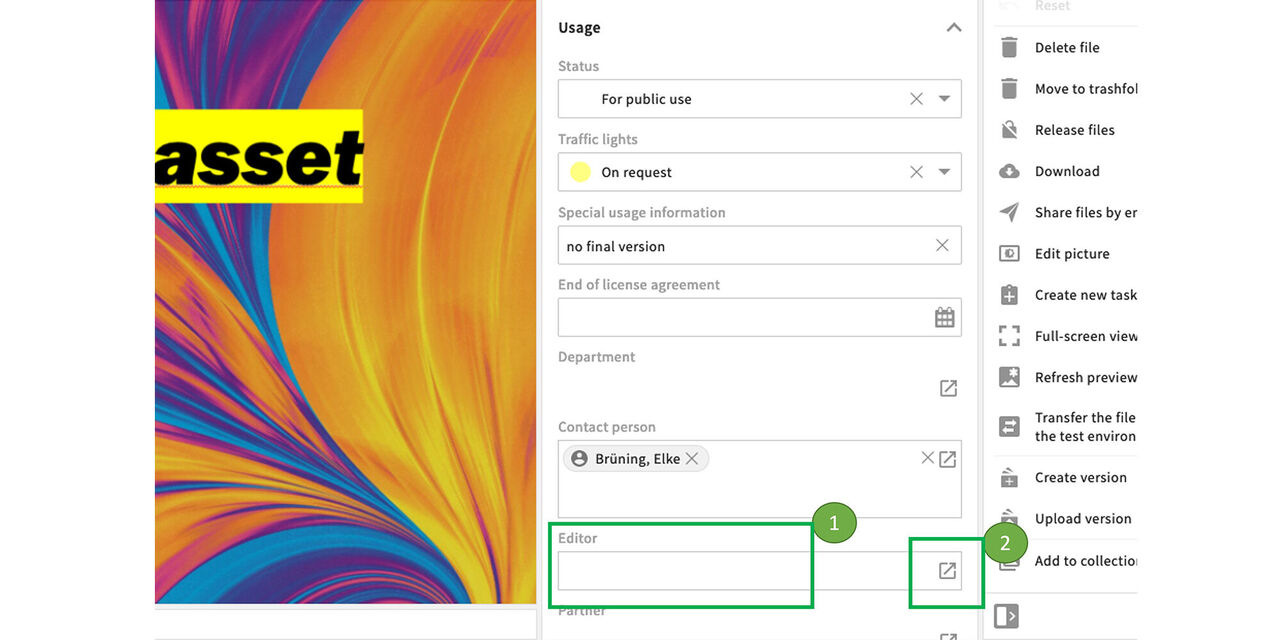
Editor
Despite the restriction of the asset, you can name certain people who are still allowed to download it without request. This makes sense with teammates, for example.
Go to the Editor text box.
Find and add the name(s) via the menu.
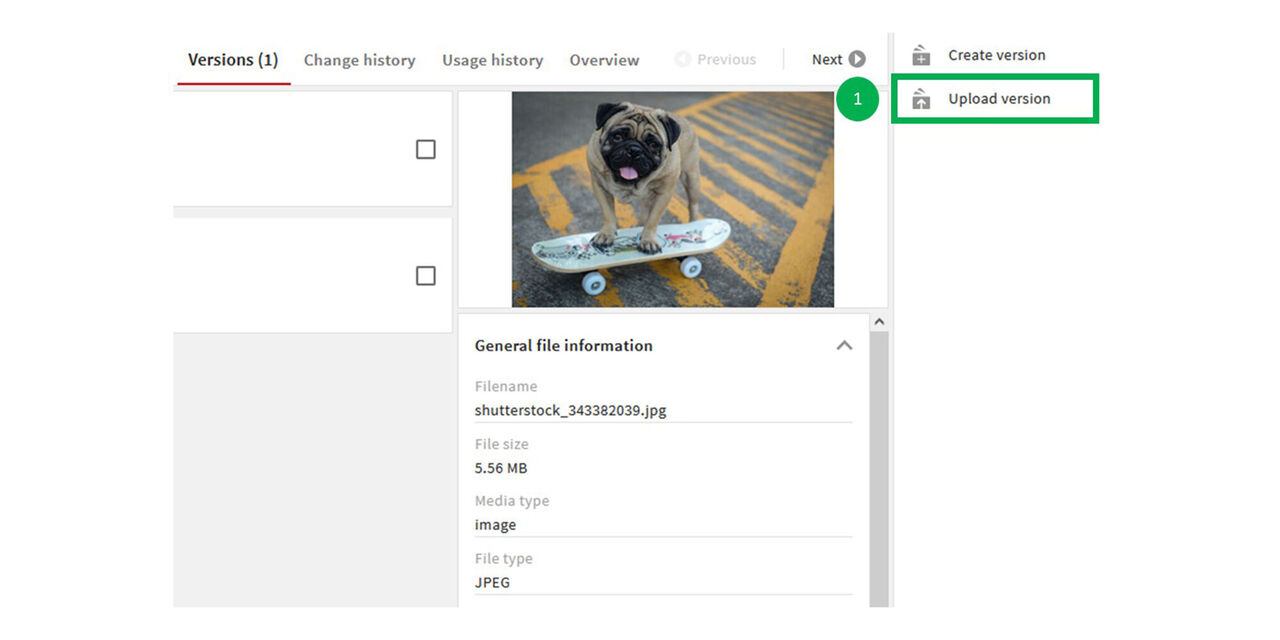
Upload versions
New version vs new file
New version if:
- Different working statuses of a file
- Revision/replacement of an existing file
New file if:
- Completely recreated files
- Variants of an existing file, e.g. different formats
- Closed files created from open files, e.g. JPG from PSD or TIFF from RAW file (see evolution tree)
Step 1
- From the area “Versions” of an asset click on “Upload Version”
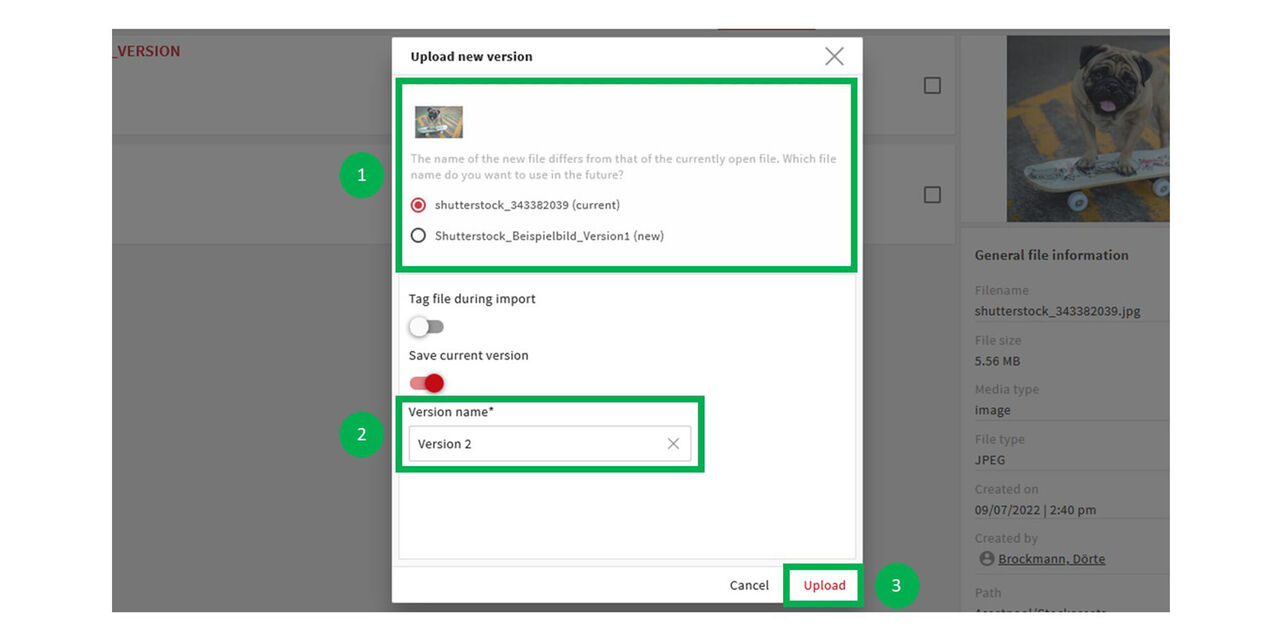
Step 2
Choose the correct file if the file you want to upload has a different name to the file that already exists
Type in a name for the new version
Click on “Upload”

Step 3
The new version has been uploaded.
.
Create versions
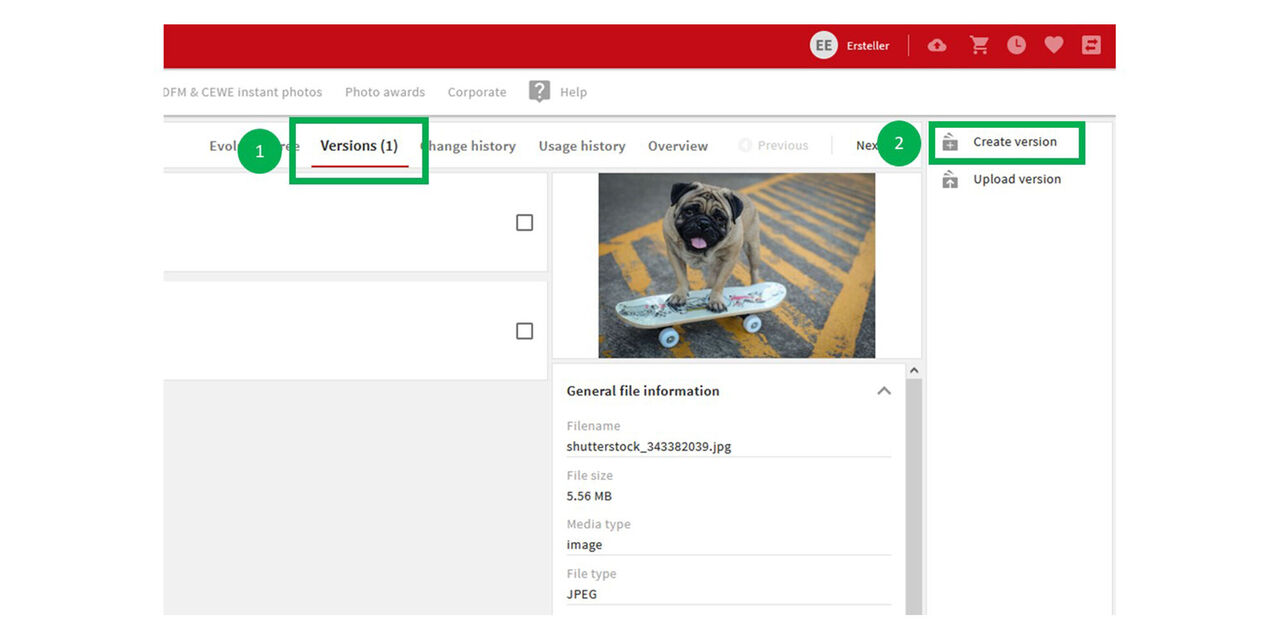
Step 1
When using the Photoshop desktop version (graphic designers) and you want to work on asset while keeping the existing one, you can create another version of it.
- Mark the asset and go to "Versions"
- Then click on "Create version"
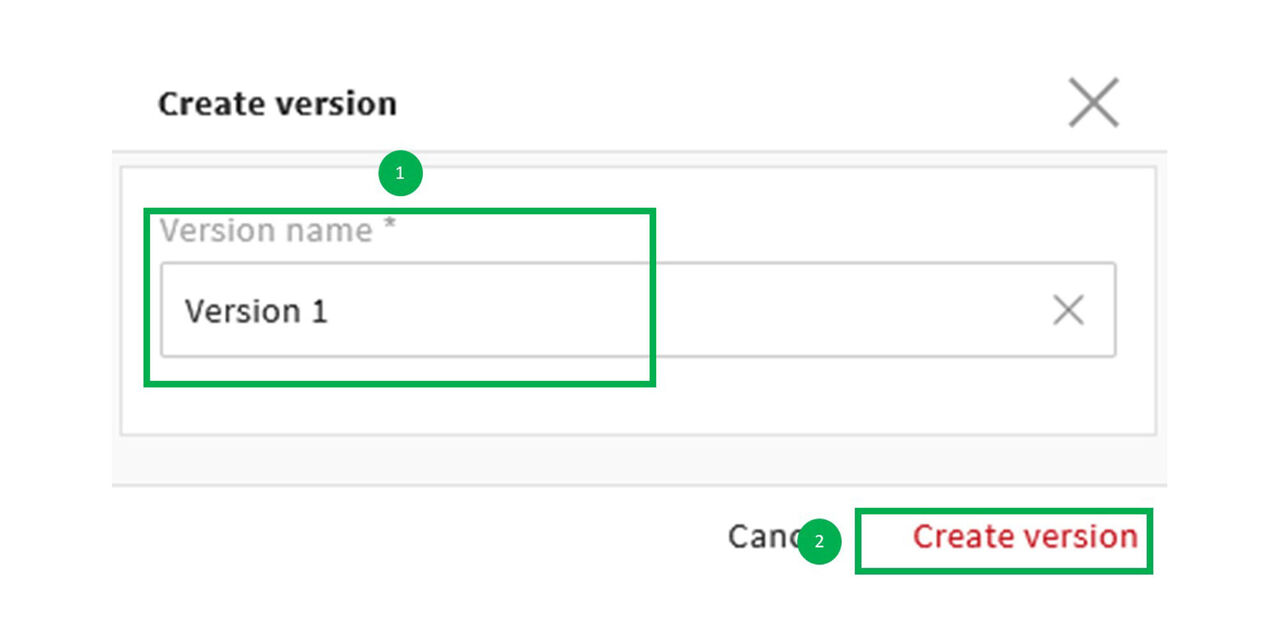
Step 2
- Vergib unter “Versionsname” einen Namen für die neue Version
- Klicke auf “Version erstellen”
Step 3
CEWE MediaAssets has now created a second version of this asset
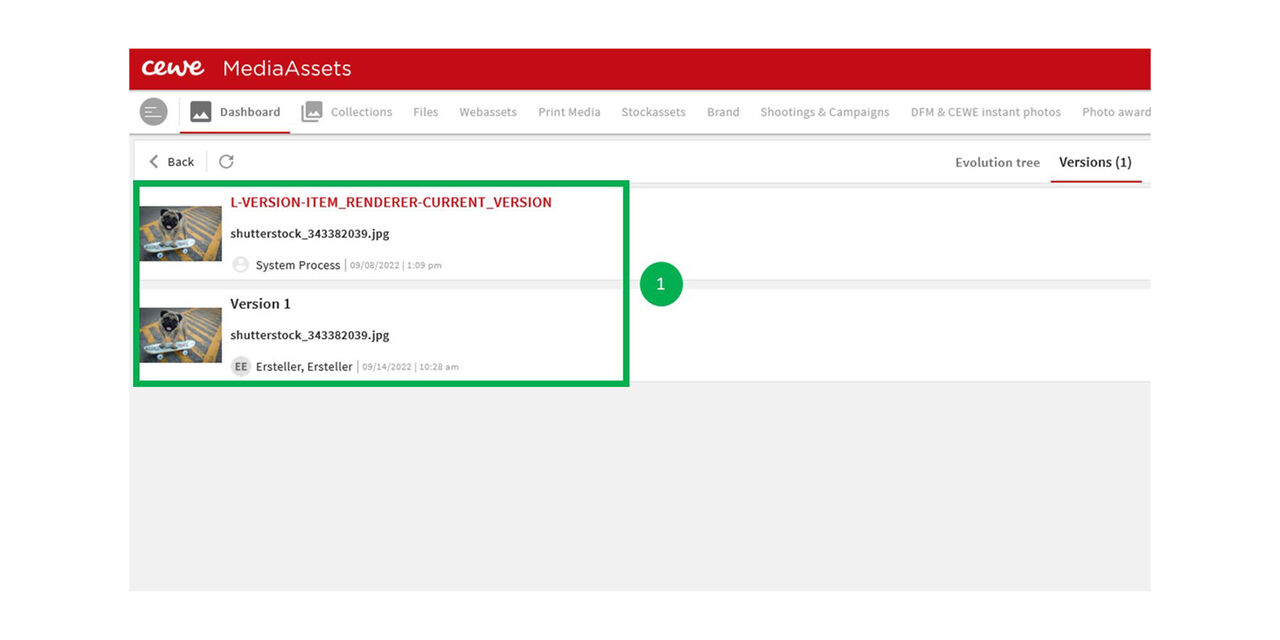
Delete versions
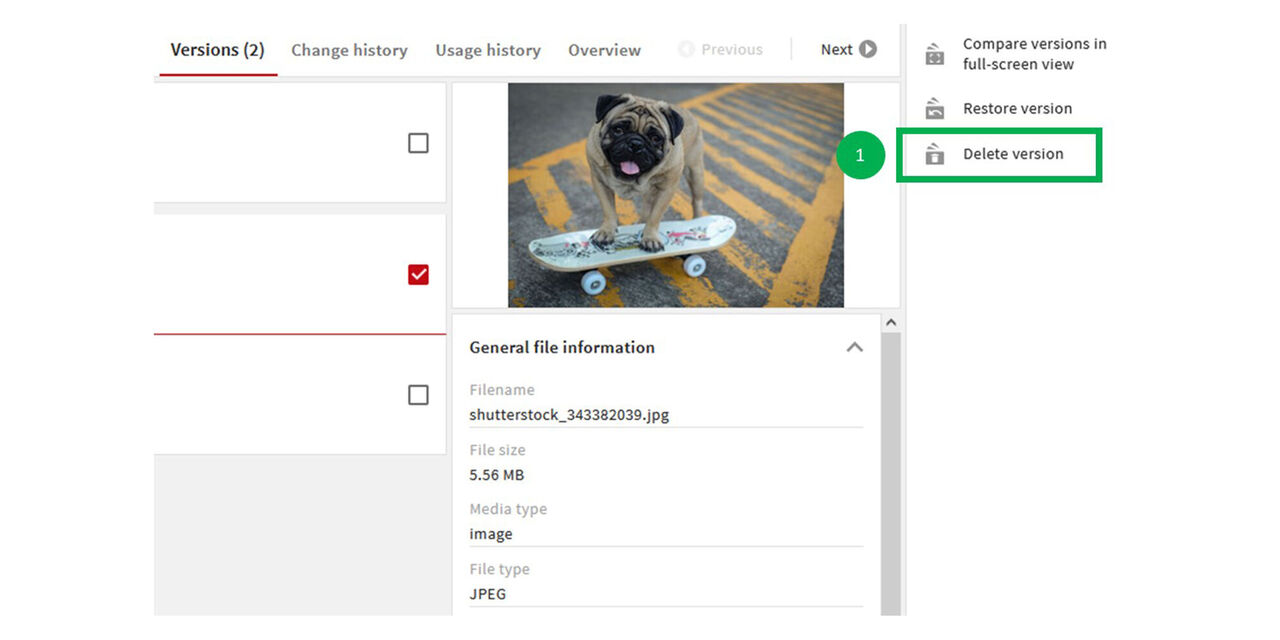
Step 1
- If at least two versions of an Asset exist, it is possible to delete one of them. Therefore click on “Delete version"
.

Step 2
- Confirm the deletion by clicking on “Yes, delete version”
Step 3
The version now has been deleted.
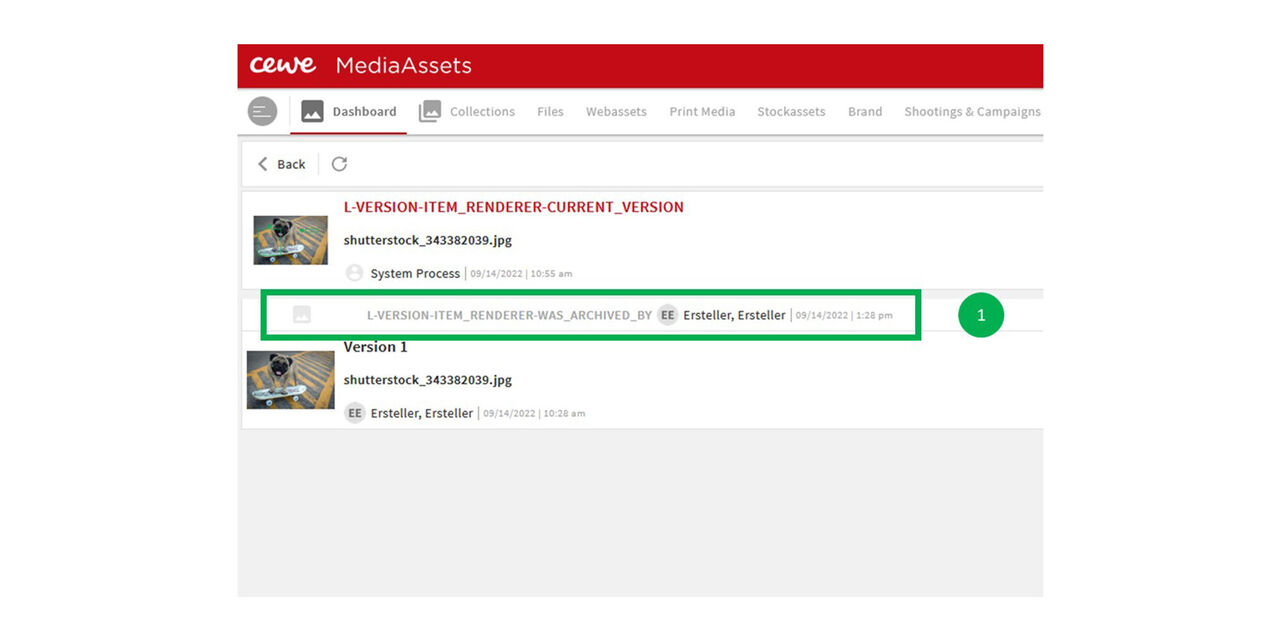
Restore versions
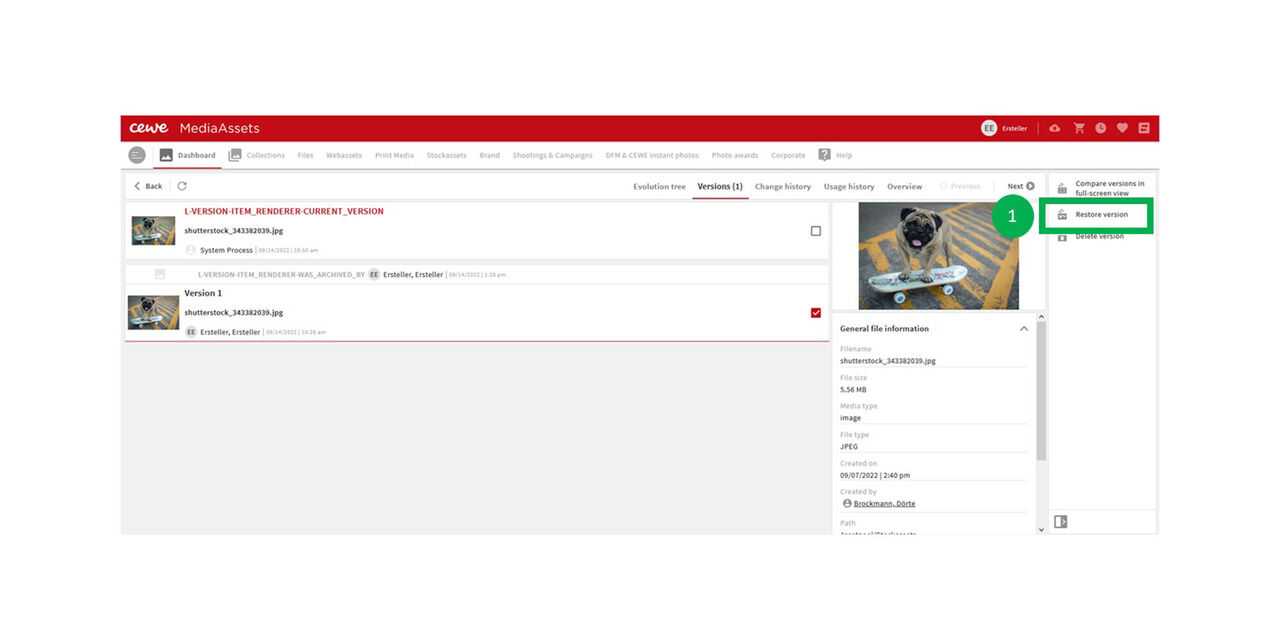
Step 1
A deleted version can be restored.
- Click on the version you want to restore and then click on “Restore version”.
,
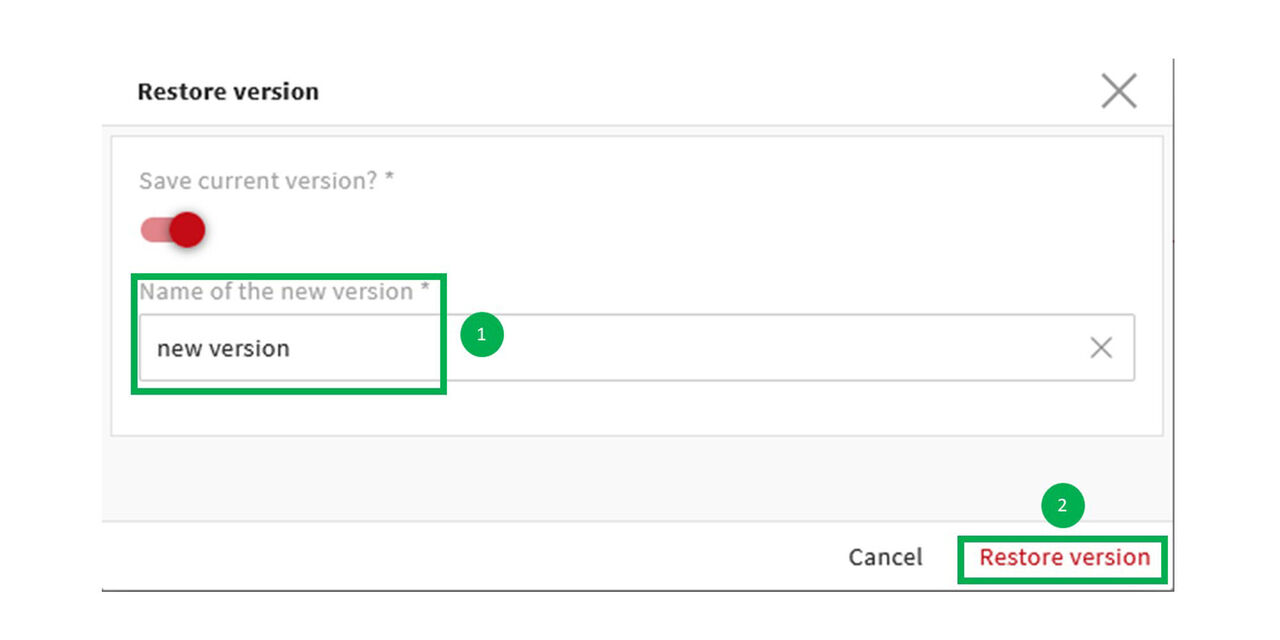
Step 2
- Type in a new name for the version
- Click on “Restore version
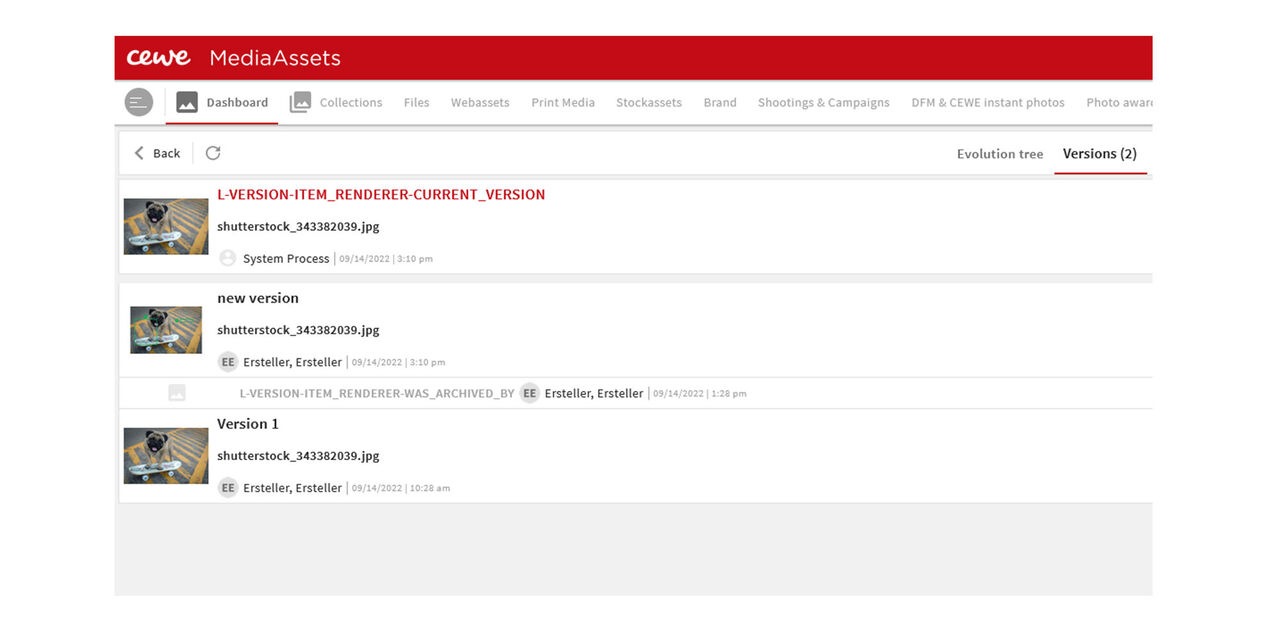
Step 3
The version now has been restored.
.